General description at Darrin's
Maintenance - Porsche recommends replacementof the transmission oil every 30,000 miles with the following specification:
924: Approx 2.64 qts hypoid oil SAE 80 or 80W90 GL4
924 Turbo: Approx 2.64 qts hypoid oil SAE 80 GL4
Except 1979 924 and 1980 924 Turbo: Approx 2.64 qts hypoid oil SAE 90 GL5
In other words - buy at least 3 quarts! Preferably 4 to allow for the remainder you can't get out of the bottom. Conventional (dinosaur) oil will do, but synthetics such as Redline, Mobil 1, and Swepco are widely favored and do quite well. The different specifications listed above reflect that the 1979 924 and the 1980 924 Turbo had a different transaxle type, the "snailshell." More on this below.
The transmission oil is replaced by removing the lower of the two plugs on the side of the transaxle, draining the oil, and refilling through the top plug hole until the gear lube just starts to come out of or is level with the top hole. The plugs are on the left hand side of the transaxle, and are a 17mm Allen key. This Allen key is readily available either from the online/mail-order parts dealers or VW shops (that deal with air-cooled VW's). Some have had success using bolts with 17mm hex heads. Part of the end of the allen wrench can be chopped off using a bandsaw, hacksaw, or die grinder, so that a 1" section can be used with a standard 17mm wrench. This can make service much easier on some vehicles where space around the exhaust is limited.
In servicing the transmission, it is a good idea to first remove the upper plug when changing fluid for the very first time. Then remove the bottom plug and drain the old fluid. In addition to speeding the flow of old oil out of the trans, it will ensure that you are able to remove the upper plug - which can be hard - before draining your transmission! It's good to know you will be able to put in new fluid before you remove the old stuff! Getting the new fluid into the transaxle can also be very difficult due to the lack of space in which to work. The best thing is to find a hand-pump with attached hose that will fit into the top of your gear lube bottle. Lubri-Matic makes exactly such a small pump, a little plastic one that is like the squirt mechanism in a glass-cleaner bottle, which costs in the neighborhood of $15USD. It greatly eases the process, allowing the entire gear lube bottle to be below the trans but still easily allowing you to pump the fluid in.
Identification
Which transaxle is it, or, are you confused yet? Haynes really confused me. Hint: look at the specifications where the code letters for each type are listed. The code letters are how you can tell exactly which is installed by checking the casting.
There are two basic types of Manual transmission, Audi and Porsche based. The 76-78 cars were delivered with a 4-speed transmission of Audi origin. This transmission is fairly robust and common, but not the fastest for the car.
Then, in '79, a 5-speed trans based on 915 internals (the trans used in late-70's 911's) was introduced. This is referred to the snailshell, because of the pattern of the diff housing (see picture below). However, it is even more easily identified by the shift pattern - 1st is directly below Reverse, with the main H-pattern formed by 2nd-5th. Due perhaps both to the unusual shift pattern and the internal design, these transmissions tend to be in fairly bad shape in most 924's by now, with synchros on 1st and 2nd gear usually gone (identifiable on a test-drive by crunching when shifting into those gears with the car moving). Unfortunately, they were only in the '79
924's, so not all rebuild parts are readily available.If the synchros are only slightly worn, and the basic gears are OK, the synchro parts can be replaced successfully with 915 parts and the transmission can continue to be used. However, if the box is allowed to continue to be abused, damage to the gear teeth can result. The good news is that these, based on the 915 design, were intended to be replaceable separate of the main gear teeth. Bad news is, they are unique to the 924, and are not available. If they must be replaced, an entire new gear must be fitted, for about $1000 each from Porsche. For this reason, a '79 924 with a bad gearbox is often most economically repaired by swapping in another 924
5-speed or 944 5-speed gearbox. More about that later.In 1980 an Audi-based 5-speed was used, for the remainder of the life cycle. It looks identical externally to the earlier 4-speed, except that the tail housing is longer. It is fairly reliable and robust, and has a normal shift pattern.
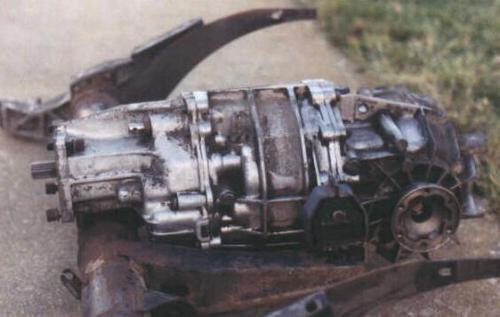
A 3-speed automatic was also available for the 924, and it was of Audi origin as well. More information about caring for this beast below. Fortunately, it tends to be the most robust of the lot, due to the fact that it's very hard to abuse. The only issue here can be the rubber damper that bolts to the back of the flywheel, replacing the flex-plate in a modern automatic. After 20 years, they can crack and break.The 931 started out in 1980 with a snailshell type 5-speed, but with larger internal shafts to handle the extra power (see picture below). The torque tube also has a larger internal shaft, and the clutch diameter is larger, concurrently. The same reliability and repair issues for the 924 snailshell apply to this gearbox. In 1981, the 931 switched over to a 5-speed Audi-based trans, but with larger shafts again, as with the torque tube shaft. This transmission then was used in the 944, and then the 924S, with slight differences in gearing. Consequently, a 944 trans can be used in a 931 as a direct bolt-in.
Removal and re-installation of the transmission and torque tube are covered well enough in the Haynes manual that they need not be reiterated here.
Transmission Swaps
So, now, how to fix a broken snailshell? Well, there are details of the procedure in the factory manual. If you are lucky enough to have a
salvageable unit, sue the manual. Otherwise, you're looking to swap in a trans, either into a '79 924 or an '80 931. This is somewhat bolt-in, but does require removal of everything behind and below the flywheel, so expect major surgery and plan time.To swap a 924 80-82 5-speed (Audi-style) into a '79 924, you will need the torque tube and trans and shifter and linkage from the donor car, including the trans mounts, and the crossmember that holds the torsion bars. The latter must be swapped out due to the different mounting scheme of the transmissions (see below). I recommend trying to find a torsion bar housing with rear sway bar mounts, if at all possible, for later use.
If you wish to use the 931- or 944-style trans, you will need all of the above, and you will also need to change your clutch. Actually, you should change your clutch (and pressure plate and throwout bearing) regardless, while you're in there. It is also advisable to check the operation of the throwout bearing on the guide tube, and make sure it is smooth and does not hang up. If it does, the guide tube (which bolts into the bellhousing) should be replaced; it's available through the dealer, relatively inexpensive. If it does not, a fresh swab of grease on the tube is sufficient.
However, to install the 944 type trans with the large shafts, without changing over the flywheel and pressure plate (though that is an option), a different clutch must be used to accommodate the larger shaft of the torque tube. Turns out, the clutch for an 83 Mustang 5-speed works just right; perfect fit on the splines of the torque tube shaft (1"x23), and the right diameter to fit under the stock pressure plate. After installing the new clutch disc, the rest is easily installed.To retrofit a 944, 924S, or later 931 trans into an '80 931, all of the above applies, except that the clutch work is not necessary; the shaft size is consistent for all 931's and the 944 and 924S.
Transmission Mountings
The pertinent question is, can the different types be interchanged? In a word, sometimes. The two styles are mounted to the car differently.
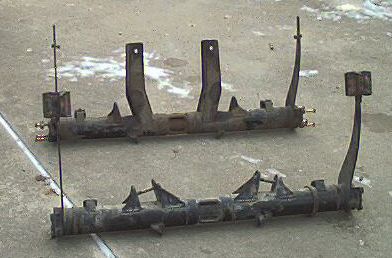
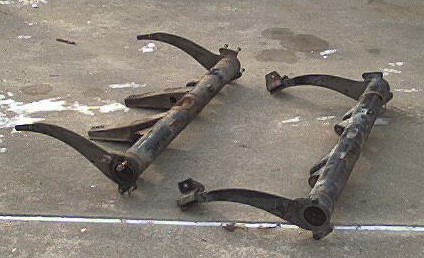
This picture is of a 5 speed snailshell and torsion bar carrier from a 1980 931. Note how the transmission sits on top of the arms. 1980 was the last year this transmission was used for US spec cars, and it was only used in the 931 in 1980. This setup is preferred by some who are interested in a track car. The transmission is easier to remove and replace. It is lighter. There are more gearsets available and it is easier to change gearsets than the Audi based unit. Here's a few more pictures of the different torsion bar carriers for the different mountings:
The Audi based transmission hangs on mounts bolted into a beam under the hatch floor. We do know that from 79 on all bodies have provision for these mounts.
The 931s have larger driveshafts and input shafts. The coupler on the left is from an 80 931 with snailshell. The right from an 82 924 with Audi unit.
It is fairly common for all of these transmissions to have problems with sloppy shifters, due to wear in the linkages. This is not surprising, given the length of the linkage. The Audi-based transmissions all share a similar layout, and suffer from wear at both ends. Wear at the shifter is easy to evaluate, just by pulling up the shifter boot. Replacement of bushings or, if wear is extreme, actual linkage parts may be necessary. Wear at the linkage located on the transmission is harder to isolate due to its location. However, there are a number of plastic bushings back there which may wear and need to be replaced. The most popular choice for this is to actually install a short-shift kit, such as sold by Paragon Products, DST Performance, or Tweeks, which have the advantage not only of replacing some or all of the worn components, but also allowing a reduced (and, in some cases, adjustable) shift ratio, resulting in quicker throws and a more enjoyable drive. General consensus on these seems to be that it does not increase the shift effort to an unbearable degree.
The snailshell trans also can suffer from wear in the linkage, but is less likely to require replacement of metal parts. In this case, only bushings must be replaced. However, some of them are less easy to get at than with the Audi design trans.
Easiest to access are the bushings at the shifter; 4 identical bushings accessed simply by pulling up the shift boot. Part number for these is 999 924 002 40. Simply remove the e-clips (2) holding the shift rods to the shift lever, remove the old bushings, and slide in the new bushings.
The bushings back at the transmission, accessible only from underneath the car (reaching around to the top side of the transmission are harder to change. The are part # 911 424 223 03. They are also used on the 914, and can be purchased from more common sources like Performance Products as such (914 shift linkage bushings). In this case, the cross pin holding the joint together (it's designed like a u-joint) must be driven out to one side. Then the joint is separated. A 13mm bolt is removed and the aluminum joint casting can then be removed from the car. The plastic bushings can be replaced by hand at this point.
An "old car" problem with the tran input shaft seal for 77/78 and 80/82
924.The transmission in the 77-78 and 80-82 924 has a small input shaft (vs 931 and 944 or 924S). The shaft seal is not located at the surface of the housing where the shaft enters the trans, but about 5 inches inside. The seal gets there by being inside a tube which goes over the shaft and this tube is in turn sealed at the surface of the housing by an o-ring. This o-ring should not be confused with a real o-ring, as it is being used as a gasket. Germans always do it the expensive way! The 931/944/924S did away with all this by adding a bearing and seal at the housing where the shaft protrudes.
Anyway! If one looks up the 924 seal on the computerized system as 999 113 275 40; it may return an "updated" number 088 311 113 C. Unless the parts man is an OLD pro this will make sense to him because the computer just "updated" you to the 944 part which is NOT the correct size. The old microfiche, etc., will be correct.
Guess what: any part that begins with 999 or 931 costs extra. Part 999 113 275 40, the seal, is NOT going to be in stock and will cost - ta da! $28.88!!!! The o-ring 088 301 699 is $1.48; but the minium quatity is 10. So I now have a lifetime supply and will share if you send an email to webmeister@924.org I will tell you the address to send your self addressed stamped envelope and 2 bucks.
 |
The tube with the seal inserted partially into the end on the left. The o-ring barely shows up around the right end. The o-ring is being used as a gasket so it is not critical. |
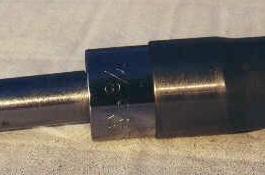 |
7/8 inch socket perfectly installs the seal. Use a 3/4 inch from the opposite end to remove. |
The trans plug (tapered) is P/N 111 301 127 E, a valid VW/Audi part number (but not usually available at a VW only shop). It was purchased for around $5.42
Transmission Removal/Installation
When removing/installing the transaxle remove both the pinch bolts from the coupler completely (they interfere with the shaft. Then slide the coupler rearward onto the trans input shaft (liberal doses of penetrant may help). The driveshaft and input shaft are now completely separated and there is no danger of 'hanging' on the shafts. During installation place the coupler in this position until the trans is bolted up then slide it forward into position. DO NOT OVERTORQUE the pinch bolts!
The automatic transmission used in the 924 is different from that used in the 944; it is a three-speed Audi-based unit. It appears to be similar to the transmission used in the Audi 5000, which can handle the additional output of the Audi 5000 Turbo engine; it then appears that either the tranny from the 5000 can be used in the 924 to handle additional output, or that components from it, such as the torque converter, can be used to modify the 924 tranny to handle additional output. One listmember who used an aftermarket kit to turbocharge his car, then converted it to automatic, later confirmed that the automatic transmission had trouble handling the added torque, and appeared to go into a sort of "limbo" between shifts, refusing to complete the shift.
Performance mods aside, the auto tranny can be quite durable if properly taken care of; for an automatic transmission this consists mainly of performing tranny service: replace the fluid, filter, and pan gasket. Fluid type is Dextron II or superseded (often Dextron/Mercon both)... synthetic can be used without problem. Keep in mind that the differential oil will need to be changed also; it is a separate reservior in the auto tranny, as opposed to the standard trannys which share the gear oil between the transmission and differential gears.
The transmission service kit is available from dealers, aftermarket suppliers like Automotion or Performance Products, or local foreign parts suppliers. The service is very simple, and should be done every 30kmi as with the manual trans; remove the pan (which will promptly dump all remaining fluid all over your face and driveway or garage floor), unscrew the filter cover, replace the filter element and re-attach the cover, then re-install the pan with new gasket. It is highly adviseable to thoroughly clean the pan inside and out before re-installing; don't bother using a degreaser, though, and the inside will just get wet again, and the outside, if cleaned of any grease or oil, will promptly begin to corrode. Simply wipe them off. Finally refill the transmission with ATF. The final level will need to be established with the car back on the (reasonably level) ground, engine running and in gear selector in Park.
Changing the diff fluid is more of a PITA, as there is no convenient drain plug; the easiest way seems to be to use a syringe such as is commonly used for changing transmission and diff fluid to suck out all the old fluid and pump in new fluid. The syringe is available from well-equipped auto parts stores, and is similar in size and appearance to a full-size grease gun. It should have a 1-2' hose on the end of it, to be inserted through the fluid level plug hole to allow removal of the old fluid.
The torque tube is, at it's heart, a driveshaft supported by three or four ball bearings. Over time these bearings can expire and require replacement. The instructions below are compiled from notes from Eric Wiebrecht on the replacement of these bearings which is about all a rebuild consists of (in addition to a cleaning). Once the bearings are removed, they can be taken to a bearing house for identification and replacement. The cost of the bearings, usually under $15 each, is far less than the cost of a "rebuilt" torque tube.
When disassembling the torque tube to replace the bearings, the torque tube shaft can be pressed out either end of the torque tube. The shaft will come out pretty easily, as it's held by a very light press fit in the bearings, though this ease can vary depending on wear. Take a measurement of the offset from a bellhousing mating surface to the end of the drive shaft, to ensure the shaft is reassembled in about the same place. The bearings are held into the tube by metal carriers with splined rubber OD, again a press fit. Looking into the front of the torque tube, there is evidence of the splined rubber bearing carrier OD having been pressed from the front of the tube (as there are "rubber spline wipe" marks on the ID of the torque tube).
Using a long, small pipe will do the trick if it fits just on the on the step-down at the front of the shaft (the one which fits into the pilot bearing ID). This way there is a very secure location to press the shaft all the way through the rear of the tube, past the last bearing, without damaging the end of the shaft. If the shaft cannot be driven out with a rubber mallet, be sure to use a piece of wood or aluminum to prevent damage. Again, take measurements of the locations of the bearing carriers to ensure correct reassembly. The bearings/carriers themselves can then be pressed through with a second, larger pipe which pushes on the larger diameter of each bearing carrier. Once these are out, the bearings can be replaced with new, freshly-packed bearings. The bearings are then pushed back into the tube, and the shaft pressed back in, making sure to get the bearings and shaft in the same locations.