![]()
Specs for all models are shown to facilitate mental updating contemplation. Keep in mind that there are some mounting differences over the years, which may require modifications, either minor or extensive, to make swaps work. The rear sway bars are all mounted the same from '78 onward, so a sway bar from a 951 will bolt on to a '78 or later 924. However, prior to that, a different scheme was used, which will require modifications. Also, not all 924's and 944's have mounts for rear swaybars. See Rear Swaybar Mounting for more info. Front swaybar mountings also changed, this time for the 944 series, though late 924's and 931's (924 VIN 92 CN450832 onward and 931 VIN 93 CN150332 onward) also used the 944 style of swaybar mounting. The 924 swaybar bolts to the frame rails and has droplinks to the a-arms; the 944/late 924/931 swaybar in contrast bolts directly to the a-arms, and has mounts that drop down from the frame rails. Therefore in order to fit a 944 swaybar to a 924 you'd have to likely fabricate the mounting brackets, or weld on those taken from a 944. Torsion bars are all interchangeable, but front springs are not - the M030 and 944S2 and 968 springs may require installation of the entire strut assembly, and perhaps more. YMMV
|
Model |
Front Sway Bar |
F Spring Rate |
Rear Sway Bar |
Torsion Bar |
|
924 |
76-77 Opt: 20mm |
160 |
76-77 Opt: 18 mm |
76-79 Std: 22mm |
|
924 S |
? |
? |
? |
? |
|
931 |
80 on: 23mm |
160 |
14mm |
23.5mm |
|
944 |
Std: 20mm |
21.8 N/mm |
Std: None |
Std: 23.5mm, M030 24.5mm until 86, 25.5mm onwards |
|
944 S |
Std: 20mm |
21.8 N/mm |
Std: None |
Std: 23.5mm? |
|
944 S2 |
89 Std: 20mm |
Std 23.8N/mm; M030 28N/mm |
89 Std: 18 mm |
Std: 24mm |
|
944 Turbo |
Std 22.5mm, 25.5mm MY' 87 |
Std: 21.8 N/mm Opt: |
Std. 18mm |
Std: 23.5mm solid |
|
944 Turbo S |
Std 26.8 mm |
28 N/mm |
88/ 89 18mm |
Std 25.5mm solid |
|
968 |
Std: 26.8mm |
? |
Std: 16mm |
? |
Note: the 18mm rear sway bar on 76/77 924 is not a desirable 'backdate'. It does not attach to the chassis; only to the trailing arms.
Torsion bars are the one thing that WILL swap between every model. In fact, standard VW aftermarket bars 26 9/16" long are a direct fit. Below are data on VW applications and relative rates associated with these bars. While it is not certain that the data is applicable to torsion bars for the 924/944/968 cars - the wheel rates may be wrong - the RELATIVE changes are instructive none the less.
|
VW bars 26 9/16" long |
|
| 22mm (stock) | 464 lb |
| 23mm (stock) | 554 lb |
| 25mm | 773 lb |
| 26mm | 904 lb |
| 27mm | 1062 lb |
| 28mm | 1212 lb |
| 29mm | 1400 lb |
| 30mm | 1603 lb |
![]()
Alignment values are as follows.
|
Front Axle |
Value | Tolerance |
| Toe-In | 0.15 deg | 0.07 deg |
| Camber | -0.30 deg | 0.25 deg |
| Caster | 2.5 deg | +0.5 -0.25 deg |
| Rear Axle | ||
| Toe | 0 deg | 0.07 deg |
| Camber | -0.4 deg | 0.5 deg |
Front alignment adjustments are common and simple, as the front suspension is VW A1 chassis McPherson strut, so adjusting this shoudl be of no trouble to any mechanic familiar with most cars. If doing your own alignment, be aware that changing the camber, caster, or toe will affect the other two settings, so an iterative process is necessary. For those not familiar with the caster adjustment, is is achieved by loosening the two bolts that hold the rear of the a-arm to the frame rail and sliding the mount either in or out. Slid out for more caster, inwards for less caster. Then re-check your camber and toe.
The rear suspension is far less common and harder to understand, since it is an unusual torsion bar arrangement. The positive side of this is that camber and toe are adjustable simply by loosening bolts and moving parts to the correct location. The downside is that both toe and camber are adjusted at the same time, and getting them both right at the same time can be tricky. There is an eccentric bolt provided to adjust camber, but control of the toe at the same time is not possible - unless you have the Porsche tool! The tool is P221 (right), and fortunately can be bought new for less than $20. If you plan on aligning your car yourself, it's a must-have. If you plan on having the alignment done professionally, either find a mechanic who has this tool (and can therefore correctly adjust your rear alignment) or consider buying one.
![]()
Item 5, Ball bearing. The inner spacer that fits inside the bearing and over the end of the strut rod does NOT come with the bearing. It may be ordered and is a nominal amount. ($3.00 or so). There is no proper seal so these bearings get grit in em and between the bearing and the spacer. On an older car you will probably find the spacer (steel) is quite worn and grooved.
Item 4, Bearing flange. Not shown in the illustration is the rubber insert which is inside the bearing flange. The ball bearing then fits in the bottom of the insert. These are available. But you might want to consider instead using later style pieces.
The 924 and 931 strut mounts are the same. The later style is more 'solid'.To make a long story short, the all-in-one upper strut mount (replacing the original multiple piece assembly) for the 931 (will fit 924 also) USED to be 951.3433.018.03 If you try to order that, the dealer will tell you that the NEW (superseded) mount number is 951.343.018.04.... This mount comes with a half inch high crescent shaped piece on top that WILL interfere with the NACA duct of the 931, though not the 924. Be sure to get the "...03" and not the "...04" mount if you have a 931, and tell the dealer why. (You CAN go to a boneyard and get the proper "...03 strut mounts from a '86 951).
The new mounts are ONE piece and get rid of all sorts of vibrations (from the road?) that telegraph into the shifter and steering wheel( the slight vibration in the shift knob is completely gone!). Very smooth, very good road feel... faster turning at low speeds, less"queasy" - Jeanette Alhgren
![]()
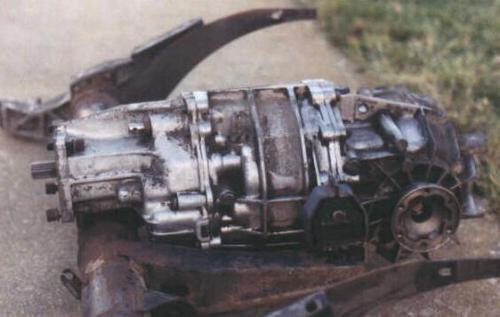
Fig, 10.5 and 10.6, Early-style/Late-style rear suspension. The figures are labled incorrectly. The text is essentially correct.
The illustrations are not entirely correct, or at least are confusing. Fig. 10-5 does NOT illustrate the early-style rear suspension. It does illustrate the early-style torsion bar carrier tube with arms extending to the rear for attachment of the snailshell style transmission. (Though this is not so much an early-style as simply snailshell compatible. The authors appear to lable this an early-style solely because of the transmission mounting arms.) The Mounting Flange (15), Spring Plate (17) and associated pieces are NOT early but are late-style. So the only thing 'early-style' about Fig. 10-5 is the torsion bar carrier tube with the transmission mounting arms. This carrier is for any 924 or 931 which had the Porsche derived 'snailshell' transmission. The actual suspension pieces are late style. Note mounting to the body is through the Mounting flange (15) and the crescent arm extending upward and rearward. (The text incorrectly states this arm is bolted to the torsion bar carrier. It is welded to the carrier and bolted to the body.) The spring plate has an eccentric bolt (21) for height adjustment.
Fig. 10-6 is of a truly early style torsion bar carrier tube, though this one is for the Audi based transmission (which is hung from the body by attachements to a beam under the hatch floor). Shown, but not labeled are the attachment points on the end of the carrier tube. But the truly erroneous thing is that this is absolutely an early-style suspension. Note there is no eccentric bolt for height adjustment; and the spring plate (26) is different; and the cover (24) retains the assembly in place of the later style mounting flange.
This picture is of torsion bar carrier from a 1980 931. Note the arms extending back to the transmission mounts. This is an 'early' style torsion bar carrier tube and a 'late' style mounting and suspension.
![]()
Grease - pretty sexy stuff, eh? Seems everybody was always talking about what the oil was but when it came to grease, well, nobody wanted to talk. So hows a body to know what to do? Check out the following threads lifted from various Porsche webs. Thanks to Dan Freedman, Jim Demas, and Michael Louie for their research into this subject for all of us. The underlying technical information on this subject comes from the lubrication engineers at Mobil and Valvoline.
The basic requirements for a CV joint grease are that it be a high-tact grease (meaning it will stay where it is placed) and that is must have lots of poly-sulfide strands, which handle pressure well (essential in CV joints) and will stay put (see first requirement). Mobil 1 synthetic grease has light tact (due to a lack of a sufficient amount of poly-sulfide) and is not suitable for CVs. It handles pressure well but will flow away from it. Mobil does make a CV joint grease for factory use in assembly, but it is not available to the public, and Mobil has not approved their synthetic grease for CV use.
The best conventional (dino) grease is true CV Joint grease, specifically marked as such. However, we are often looking for synthetic lubricants for our Porsches. Valvoline's Synthetic Grease, which is specifically rated for CV use, is acceptable, and has been used by listmembers with success. Mobil 1, on the other hands, was found by some listmembers (after trying it) to be no good, and Jim Demas was specifically instructed to remove it from his CV's.
One other grease that has been found to be acceptable for this application, and which does cost less than typical CV joint grease, is grease for railroad flatbed cars - but this is only sold in railroad size! If you'd care to buy your own drum, contact your local railroad supply house... or Dan Freedman ( dan@been-there.com ) will be happy to sell you an appropriate amount at his cost, out of his stash. One drum is a lot of CV's, even for a racer...
The basic procedure for rebuilding the CV joints is covered in the Haynes manual. The underlying idea is to remove the shafts from the car, disassemble the joints, flush out the old grease, re-assemble, repack with new grease, and reinstall.
The bolts holding the joints to the driveshaft flanges both at the wheel and transmission are usually a 6mm 12-point socket head bolt. The bit for the 12-point bolts can usually be found at any auto supply shop that supplies parts and tools for imports, especially VW's. In some cases, some or all bolts are replaced by standard socket-head cap screws, which will use a standard metric hex key. It is best to get a set of metric hex key sockets, for use with a ratchet, as they are far more versatile than the key sets. The sizes from 4mm to 10mm will cover most things up to the head bolts - though 3mm will be wanted in either a key or socket form to adjust the valves also. If the bolts are replaced, Metric Grade 10.9 must be used, or there will be danger of the bolts snapping, especially on 931's or 924S'. Clean the head cavities of all the bolts, and tap the 12-point bit into the bolt before removing for the first time, to minimize the chance of stripping a bolt head.
Before dissassembling the joints, use a punch or file to mark one point on each inner and outer race, to simplify reassembly.
The joints do not have to be completely removed from the shafts, as this involves a press; the boots can simply be pushed back on the shaft, and the balls and cage removed from the inner race. The balls and races are quite easy to clean, but make sure all old grease is removed from all the folds of the boot. Make sure plenty of brake cleaner is used to get all traces of dirt and old grease from the joints. Use non-chlorinated cleaner, as it's a lot easier on the hands.
Use lots of grease to put the joints back together; the more the better. Getting the outer race back on will be a little fiddly till you've done it a few times, but it will work. The grooves in the outer race will point in the opposite angle than the grooves in the inner race; use the marks already made to help.
Finally, use brake cleaner to clean off all threads on all bolts and in all flanges. Use strong Loctite on all of the bolts to prevent any chance of them backing out; some racers and spirited drivers have reported the bolts coming loose or even falling out entirely when driven. The best option is to cross-drill and safety-wire all the bolts on all the flanges, but this is unlikely to be necessary except for the higher-powered cars. Be sure to properly torque the bolts.
The CV joints and, by extension, the driveshafts, are usually good for many thousands of miles when properly maintained, and the only maintenance these units require, aside from replacing torn boots, is the cleaning and re-packing described above. Additionally, some drivers have chosen to swap the driveshafts left-to-right to change the direction of wear on worn CV joints, thereby doubling the effective life of the joints. Numerous listmembers have done this without any reports of ill effects. However, this is not possible on 924's equipped with the automatic transmission, as the driveshafts are different lengths on each side.
![]()
In the 924/944 the torsion bar will rotate about 3.5 degrees per inch of ride height. Say you want to re-index the bars by about 7 degrees. Each differential spline is good for 0.9 degrees of rotation so you want to crank in about 8 differential splines. This is a little easier said than done when you get down to handling a greasy torsion bar.
So what you want to do is remove the trailing arms and drop the torsion tube. Make a gauge out of cardboard or aluminum sheet that will reference to the torsion bar end cap and allow you to measure deflection out on the spring plate. Mark the position of the spring plate on the gauge. Then calculate the desired new position on the gauge. Do this by measuring out on the gauge from the center of the torsion bar to the mark you made on the gauge. If this measurement is 12" (for example) from the center of the torsion bar then the new position will be:
12" * sin (7) = 1.46"
Remove the end caps and, using the differential splines, reposition the spring plate to hit the new mark on the gauge. Repeat for the other side. This will be to some extent a trial and error process involving indexing the bar, positioning the end cap, installing a couple of the bolts (not completely tight), measurement, repeat.
Note that you want to center the height eccentric before making the measurements. This will leave you with some wiggle room when you screw it all back together. - Doug Donsbach
The 924 used two versions of rear swaybar. The first was an 18mm swaybar that bolted (through 2 bolts at each end) directly to each trailing arm. There were no endlinks, and no center mounting or bushings, due to this installation method. However, this was not the most sophisticated method of mounting a swaybar in the rear, and although used in a number of other cars produced about the same time, it was dropped in favor of the later method.
The later swaybar, used through the 944 Turbo, was attached to the rear torsion bar with bushings and mounting plates, and connected to the trailing arms using proper endlinks. Because this method of attachment provides for a more efficient actuation of the swaybar, the bar was reduced in size to 14mm to retain equivalent stiffness to the early 18mm bar. This does not mean it is softer than the 18mm bar! Due to commonality with the later 944 cars, this means that upgrades for cars that already have rear swaybars are easily available. However, as some cars were delivered without rear swaybars, your car may not have mounting points for the rear swaybar if you do not already have a swaybar. Therefore, in order to add a swaybar, you must first add mountings. This information holds true not only for the original 924, but also for the 944 and 924S.
So, how do the bars mount? Two options are available. A Weltmeister kit is available which clamps onto the torsion bar carrier and provides mounting points for the swaybar. The other option is to have factory mounts, or a duplication of the factory mounts, welded on to your existing torsion bar carrier. Here's a few up-close pictures of the factory mounts:

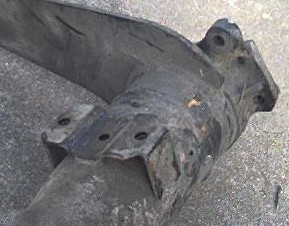
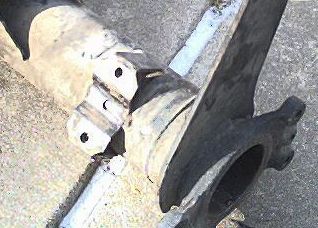
The holes on either end of the mount, of course, have nuts welded on the backside to ease installation of the bar with the torsion bar carrier installed in the car.
With mounts and brackets in place, all that's left is assembly. Required parts will be the swaybar, with appropriate-size bushings, endlinks (P/N 477 511 051A) and an attachment to the trailing arm. Here's a tricky point: cars with rear swaybars attach the endlinks to the trailing arm on the camber eccentric bolt - this is one of the three bolts that hold the trailing arm to the spring plate. Specifically, the eccentric bolt is double-ended, with a hex and eccentric in the middle. One end goes through the trailing arm and spring plate; the other goes through the endlink. Of course, as you might imagine, if your car did not have a swaybar, it also did not have this special bolt! Cars without rear swaybars simply used a normal eccentric. This means that the proper eccentric bolt must be added. This is P/N 477 511 515.